Showing posts with label Monday Made-It. Show all posts

Monday, July 28, 2014

Monday Made It! (July 28)

Hello all! I am glad to be back once again in the blogosphere. I may have mentioned this, but Husband and I live out in the country. Our internet is very temperamental. And it apparently decided to die for two weeks :( So that's where I've been! Ha.

http://4thgradefrolics.blogspot.com/2014/07/monday-made-it-summer-week-9.html
It's Monday! You know what that means... time to link up your latest projects with Tara from 4th Grade Frolics. And believe me, I only have like a MILLION projects going on right now. So here we go!
 
 
 My first "made it" is actually NOT school-related. *gasp* I know, right? Check out my new wreath for August/September!


The story of this wreath and how I actually got myself to make something that WASN'T for school: I've had the same wreath up since spring. Like, a long time ago. It didn't really bother me though, because it was burlap, pink, and blue. Summer-ish, right? Sometimes I would look at it and think about making/buying a new one...but then I would think of something better to do (most likely school-related). So what made me change my mind? Husband. Yes. For real. He noticed how long it had been up there, and offered to buy me a new one. That's how I knew....it was time. So during my weekly (feels like daily sometimes) Walmart (small town Suzy here) I snatched up a cute wreath and some fake foliage and slapped this thing together. Oh, and a letter B for Burns. It's actually gold, not white like it looks in the picture. Whatcha think?

 http://www.teacherspayteachers.com/Product/Talk-Turns-Taking-Turns-During-Literature-Discussion-FREEBIE-1351505 
My next "made it" is a new freebie from my TPT store! I've been thinking a lot lately about literature circles and how I use them in my classroom. I feel like everyone (teachers) knows what they are and generally how literature circles function, but it wasn't until this summer (after some awesome workshops) that I really learned how to set them up and make them successful. This freebie is one of the ways that I plan on doing that this year. I learned this from my super awesome student teaching mentor. She actually used poker chips (love it) with her kids!

How it works: At the beginning of the discussion, give each group member a couple of talk turns (or poker chips!). The rules? To share or take part in the discussion, you have to put a "talk turn" in the pile. When you run out, you're done! Everyone has to use all of their turns before the discussion is over. Once everyone has run out of talk turns, you can then share freely.

Let's talk about it: Would I use this all year with my groups? No. A goal of literature circles is that students learn the "norms" of discussions- when and how to take turns talking to one another about a topic. In real conversations, people don't carry around talk turn cards (although don't you wish some people did?) and my kids need to learn that. But, this is a great way to introduce this concept, especially to younger kiddos. At the beginning of the year, when we are learning the "norms" of literature circles, I will most definitely be using these, then taking them away gradually. I would also pull these out if some of my kids are backsliding into talking too much or not participating in discussions. You can do this with any small objects you already have OR you can go "Cute in the Classroom" style and download this freebie ;)
What tools do you use to make literature circles run smoothly in the classroom? I'd love to hear! 

 
And because I'm awesome, here's another "made it" freebie from my store...

http://www.teacherspayteachers.com/Product/The-Writing-Process-Chart-FREEBIE-1351802
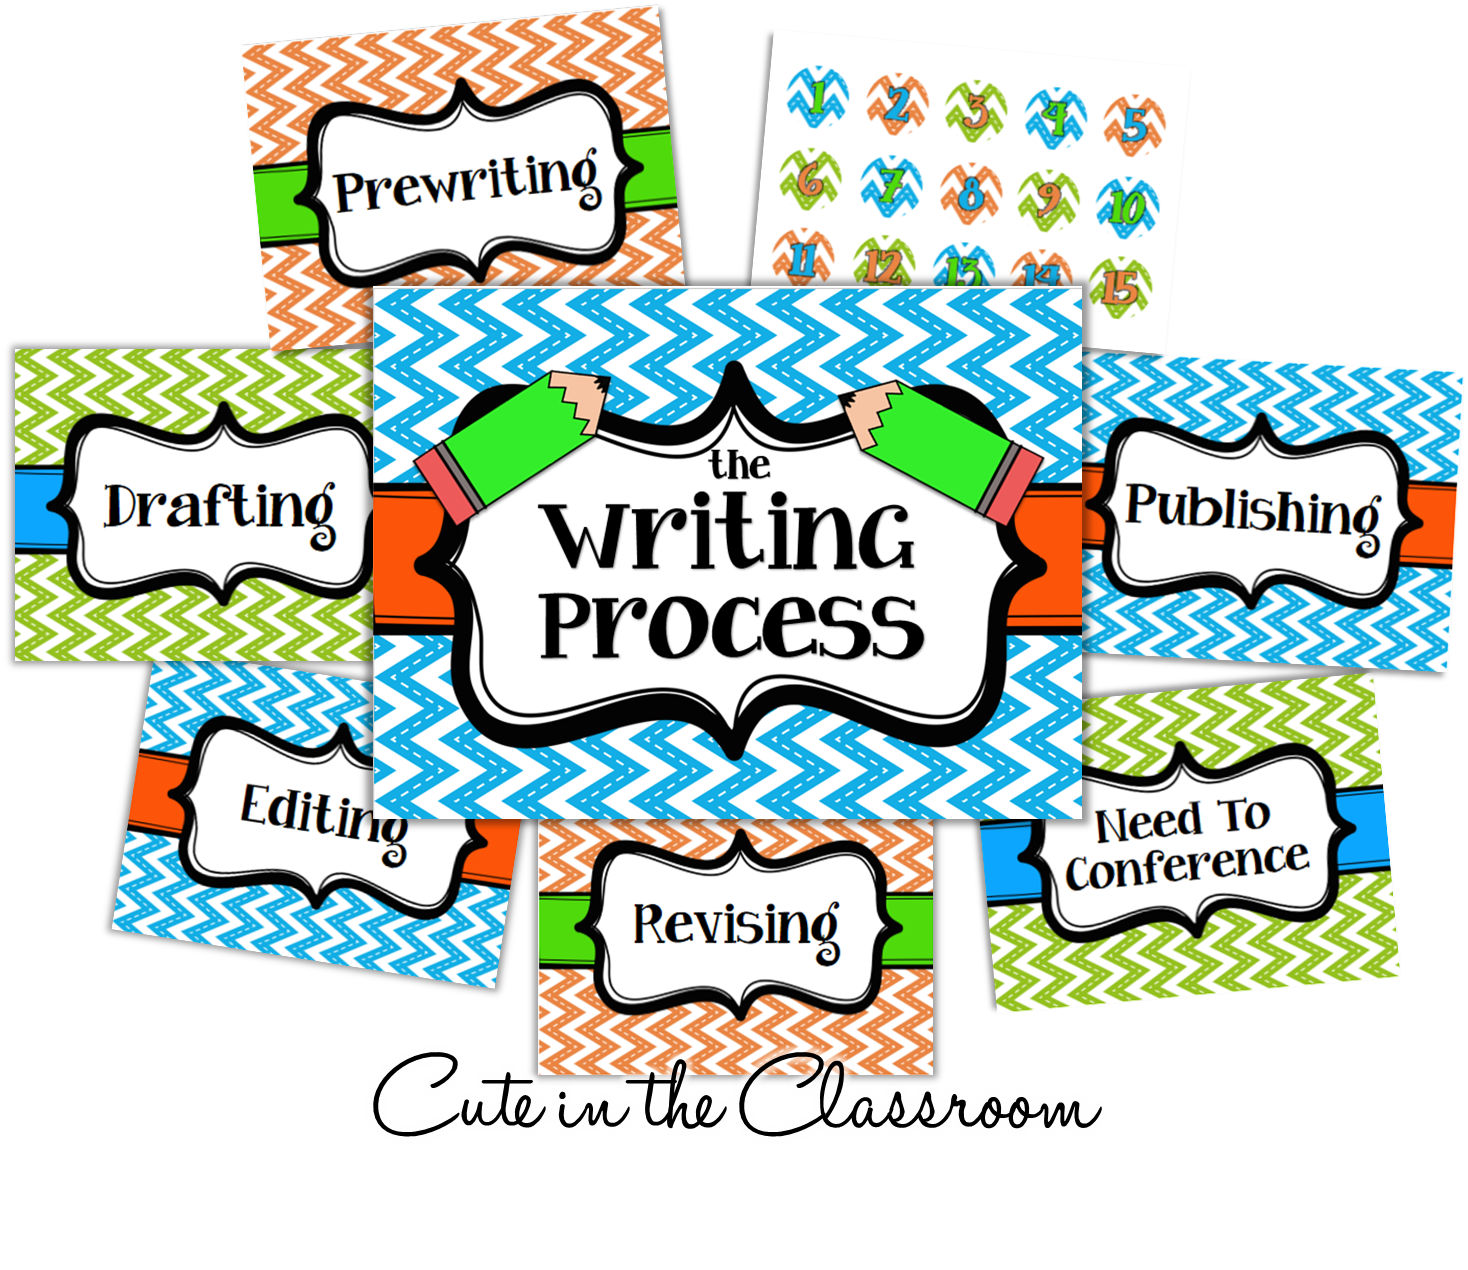
 Another for-my-classroom "made it". I plan on using this writing process chart to track my students' progress in their writing. I'm tired of writing time being chaos and students calling my name or lining up by my desk for help (don't judge me...you've been there). Now, they will have a clothespin (with a cute little matching number, of course) to move up and down as needed. Need a conference? Move your clip there. With one glance, I can tell who is doing what. And I like that. Feel free to grab up this freebie!


And lastly, another digital "made-it". When I make some more progress in my classroom I promise I will post more real-life ones!

http://www.teacherspayteachers.com/Product/Red-Black-White-Polka-Dot-Classroom-Library-Labels-Request-from-Pamela-S-1351429

More library labels! This time I made some red and black labels with white polka dots for a TPT follower. I love how cutesy these are. The thing I love (and hate) the most about my library labels (I also have chevron and zebra/rockstar) is that there are SO many choices. 172 to be exact. Today I was working on my classroom library and laboring over which categories to make or not...ah the joys of teaching. Anyways, grab 'em if you need em :)

So there are my "made-it"s for today! I worked in my room today and will return tomorrow, so hopefully I will remember to take pictures of what I "make" so I can post again next week about them! Go see what everybody is making and what not!

Monday, July 7, 2014

Monday Made It - FINALLY!

This Arkansas girl is BACK! Remember like three weeks ago when I said I was going to do a Monday Made It about those pillows I made for my classroom library? Yeah, that never happened. Because this did...

http://instagram.com/cuteintheclassroom

Yep. I've had a good reason for my absence. Hawaii! It was amazing. We spent a week on Maui and ohmygoodness I didn't want to leave. I kept trying to convince everyone that technically I didn't have to come home til August...

Anywho. I refused to bring my computer with me on vacation. I usually do. But this time I just brought books instead. Fun books. Not even teacher books. And I did ZERO work. Did I think about work? Yes. Can't help that. When I was sitting in the airport did I wish I had brought my computer? A little. But sometimes you need to make yourself take a mental vacation too. So that's what I did! It was so perfect. But now I am back, refreshed, and ready to go!
It killed me being away from the blogosphere for even a week! My Bloglovin feed is OUT OF CONTROL. So much to catch up on. 

But first, I thought I would finally share with you the Monday Made It I promised like three million weeks ago: my new classroom library pillows!

http://4thgradefrolics.blogspot.com/2014/07/monday-made-it-summer-week-6.html

So here is the story of The Pillows.
When I came to my classroom last year as a first year teacher, I was very blessed. The teachers before me had left LOTS of stuff. Most of that was a good thing. There was a lot of cleaning/chunking that happened this time last year. But they left rugs, lamps, shelves, stools...it was great. They also left two beanbag chairs for the library. Well, actually three. But one of them looked like it had been there since the 80's. So that one went goodbye. And I had two great beanbag chairs for my fourth graders to fight over sit in this year and read. Well naturally, as the year went on, one of the beanbags died. Big hole. Stuffing everywhere. Sad kids. Sad me. Because beanbags, for some horrible reason, are actually kind of expensive. And I did not want to buy new ones. I thought about trying to salvage the dead one...matching duct tape came to mind...but no. A new, better idea happened. Pillows!


When Husband and I got married (two years this month!), we got a couch from a family friend. An old, comfy, loved on couch. It is the best for naps. And it came with throw pillows that were not really my style, if you know what I mean. So I chunked the covers and kept the insides, thinking "you never know" and put them in a closet. Two years later, I remembered the pillow inserts. And decided to put them to good use.


 I bought some microfiber filling and stuffed them up some more. I had to cut them open to do this, and I don't sew, so that's why they are ghetto-tied at the tops. Ha.


At this point, I think it would have been super cute to sew some pillows in a cute, durable fabric. You know, chevron or something. But I don't sew. Not even a little. Or if you like near an Ikea, they sell pillow covers on the cheap. That would have been easy too. And probably better looking. But again, I don't sew. And Ikea is four hours away. So this is what I came up with!
I bought some fleece (about two yards of each to make four pillows...with left over!) in teal and pink, two of my classroom colors. I really wanted brown or orange or lime green. But remember, I'm Small Town Suzy. Walmart is my fabric store. I got lucky with these, okay? Okay.


So with some "help" from Lewis, who seemed to think I bought the fleece for him to lay on, I started on my pillows.

Note- This is not a tutorial. I did not follow instructions. I did not look up how to make these. I did not measure. I am a start-cutting-and-see-where-things-go kind of person. So I eyeballed two squares of each color, cut two to three inch strips on the sides, put the pillow in the middle, and double-knotted them together. Voila! Pillows. Done.

Tips
1. If you are really into being neat and tidy, you should probably look up a tutorial to follow. You should use a ruler. You should measure things. It would make you feel better, and they would probably look better than mine.

2. You do not have to use two colors. I chose two colors because (a) there was not enough teal fleece to do four pillows (b) I like pink and (c) I made myself choose something the boys would like too. Originally, I was going to make two teal pillows and two pink pillows, but then I thought about how much my students might argue about what color they got to sit on. So I made them all the same. Because I like to solve problems before I have them.

3. Get the good stuff. It's hard to tell, but I used two different types of fleece for these. The pink is the normal, thick kind. Good. The teal is thin and stretchy. Bad. You want to get all the same kind, first of all, and all the good kind. It will make measuring (if you do that), cutting, and tying your pillows easier.

4. You can look up different ways to tie these. A woman in line at the fabric section was telling me about a cool way to braid the fleece together instead of tying, that way you don't have a bunch of loose ends. This might be good for younger grades. But I am lazy and just tied them together really well.

5. This project is insanely CHEAP and easy. Hence my "don't care" attitude about the whole measuring thing. Seriously. It helped that I already had the pillow inserts (I didn't have to buy as much filling), but the entire project, including fleece and microfiber filling to make four pillows (two square feet each...huge!) cost me around $25. That's it. Even if they don't last more than one year, that is okay with me. It took one evening of work (I even did this while watching TV) and just over twenty bucks. It doesn't get much better than that.

So that is my Monday Made It. Fancy? Not at all. But this was a "made it" that my wallet and my classroom can be happy about it.
What have you made this week? Be sure to stop by and link up!


Monday, August 5, 2013

Monday Made It [August 5th] & A Classroom Sneak Peek!

Happy Monday everyone! I'm just stopping in for a quick linky for Monday Made It with Tara from 4th Grade Frolics. I have professional development meetings Wednesday, Thursday, and all of next week. So I am trying my best to relax (yeah right) and enjoy my last few days of vacation! So, naturally, I worked in my classroom today. Ha! But it's pretty much ready for kiddos! I'm so excited! Don't worry, I'll have a "classroom tour" post coming up soon. My awesome MIL is gonna help me out with some pictures :)


But anyway! Back to my Made It! I can't do anything "quick"... haha. 


Check out my Class Twitter that I made! My room has a bird theme, so it goes perfectly. It has three "profiles": 
Me, of course. Where I tweet messages about what's going on that day or anything, really. 
The 'Reminders' profile tweets messages about upcoming tests, projects, events, etc.
And finally the 'Special Guest' profile is reserved for the Student of the Month, someone that is super good, a student with a birthday, or other things like that. If chosen, they get to choose what message to share.

Our class twitter is made from laminated sheets of white copy paper (which makes it dry-erase!) and graphics/pictures modeled after the actual website that I just threw together in Word.
I have it stapled on the bulletin board outside my classroom, which you can see in this next picture. I plan on using the clothespins to display student work as the year goes on.


So what do you think? I can't wait to try this out with my students. If they like it, I may think of some other ways to "tweet" in the classroom :)

So that's your sneak peek of my classroom! A big reveal is coming soon. Make sure you go link up your Made It for the week here. Have a good week!


http://www.theteachingtribune.com/2014/06/throwback-thursday-june-5th-2014.html

Tuesday, July 30, 2013

Better Late than Never, Right?

Hello all! So it's been a few days! (again...) The husband and I had a great weekend in Dallas celebrating our first wedding anniversary! Thanks so much to everyone who left such nice comments and well wishes :)

My husband is just fun. Maybe it's why I married him, I don't know ;) But we had such a good time shopping, eating, shopping some more...( I told you it's my favorite sport). I finally got to visit the most glorious of all stores, Ikea. 


*Sigh* It was life-changing. And very crowded. We went on a Saturday afternoon. Not recommended. It was like furniture-Disneyworld-madness-get-me-out-of-here-oh-look-how-cute-and-cheap-that-is. Or at least that's how I would describe it. I didn't actually buy anything for my classroom (shocking, I know!) and instead got two new bookcases and pillows for my living room. They look awesome! And they were super cheap, of course. I made lots of "mental notes" about future classroom purchases, though ;)

Cool little shopping area we went to Saturday night

I also got to visit another one of my favorite places, Half-Price Books. Have you guys ever experienced this place? I love it! Heck, I just love books. But anywho. I was so excited to find some awesome chapter books for my class for just $1! Whaaaa? My poor husband. I am pushing 750 books in my classroom library...but he still bought me more. He's the best :) I ended up getting some much needed titles for fourth grade (or at least in my opinion), including Diary of a Wimpy Kid, Percy Jackson, and Series of Unfortunate Events. Score, right?! I was so excited. 

So it was a great weekend! I drooled over everything at Michael Kors, Pottery Barn, and Cotton On. My faves! And ate my weight in Olive Garden, Five Guys, and Einstein Bagels. Can you tell we don't make it to "the big city" much?? Haha. 

 
 So I am day late to Monday Made It, but for good reason! This week (among many other random little projects) I made this Voice Levels chart for my classroom. Don't you love those frames from Krista Wallden? I love her stuff. I put it up in my room yesterday but I forgot to take a picture. This is how I assembled it though! I made it nice and big so it could be seen from every corner of my room, and used some sticky tack to attach the arrow to the wall. So simple, right?

And, as you can see, it's up in my TPT store for just $1.00! So go grab it now!
I've also made some pricing changes on several of my products. For example, both of my Spring Writing Prompts packets are just a dollar and All About Earth Day and All About President's Day are down to $2.00. So snatch these up!

Well, I'm off to work on more school stuff and get ready for another workshop tomorrow. Have a great week and head over to Tara's to link up :)

Just for "funzies", the first three comment-ors that leave their email get this voice level chart for free :)

Monday, July 22, 2013

Monday Made It! 7/22/13


Happy Monday! Can you believe there are only a few Monday's left until school starts? Our first day is the 19th, but I have a smattering of professional developments and workshops to attend before then. And guess what? I am so excited. I just can't wait to get started and meet everyone and meet my kids and just....I'm a new teacher, can you tell? Haha. But anywho! My classroom is really starting to take shape. I am itching to post pictures of it, because I am in love! I love the colors I've chosen (blue, green, orange and brown) and my massive, always-growing classroom library. But I still have a few more little things to complete first. 

For this post, I am linking up once again with Tara from Fourth Grade Frolics to talk about my "made-it" project for the week. Well actually I think I made it last week. But that's okay! Inspired by the many posts I have seen floating around the blogging world (post your's in a comment, if you have), I made synonym pockets for my classroom.


Or as I have named it, "Synonym Swap". This station in my room will encourage students that are writing to exchange their "tired" or "dead" words for a new, better synonym. I chose twenty of the words that I thought my students might need help with the most, like: funny, said, cool, good, important, very, mad, give, etc. 

Here's what I did. I started with some pockets I found in my room. I know you can buy much cuter, easier, patterned pockets at a teaching store, but these were free! They were sticky on the back (the teacher before me used them for library books). I cut out squares of scrapbook paper (still using that trusty pack I bought from Hobby Lobby...best ten dollars I've ever spent!!) and glued them on the front. Then I printed out the twenty words I chose and glued those on. To make the synonym slips for inside the pockets, I typed them up, printed them, and glued them on slips of cardstock. Although you could probably print them directly on the cardstock if it was letter sized, which mine was not. Finally, I glued/stuck the pockets onto some posterboard and hung them up in my room where my students would be able to easily reach them. And voila! A Synonym Swap!


 I can't wait to see how my students use this! Just a warning though, it took me a while to make. Lots of cutting and gluing involved! But I am so excited with how it turned out. I think as the year goes on, I will add more and more pockets to it, especially as I get to know my kids and the words they need help with.

So... Do you have a "Synonym Swap" in your room? Or something similar? If so, how do you like it? 

Also, if you leave your email below, I'd be happy to send you my "Synonym Swap" files (including the poster!) for free!
Thanks for reading! And don't forget to link up your Monday Made-It here :)


Monday, July 15, 2013

Monday Made It! 7/15/13

Hello everyone! I'm excited to share my first linky for Tara's Monday Made It over at 4th Grade Frolics.
I love looking at all the awesome and creative "made its" each week, and I'm finally joining in!
My first post is not very original, and will probably be very short. I am trying desperately to rush through my to-do list for the day in time to get a little pool time in. We'll see how that goes ;)


So after much research and blog-hopping, I finally made my very own Teacher Toolbox! CreateTeachShare is the blog that started this teacher-craze, and I loved her Q&A post. It definitely helped me through the process. Check it out here.

I will tell you this about my toolbox project, it took quite a while to get started! Not living in a huge town with you know, brand name stores besides walmart (sigh). I ordered my Stack-On 22 Drawer Bin online through Walmart.com. When you do this, you actually order it from a place called Plumstruck. Anywho. The box came in (much faster than I thought it would)....but broken :( There was a huge crack in the top, one of the corners chipped off, and one of the drawers wouldn't open. I was pretty upset! So I emailed them, and they graciously refunded my money (which was about $30 with shipping). Thankfully, this past weekend we visited my family in nearby Texarkana (the big city, you know) and I was able to head to a store and get one in person! I tried Lowe's first, but the only one they had was broken. Apparently you have to be very careful with these! Then I tried Home Depot and found tons! So I would definitely recommenced buying there in person. Just to be sure it isn't broken. And it ended up being about $17, instead of $30. So I used some of that money to buy some cute spray paint, of course!
 Note: The Stack-Ons originally come in light gray or dark blue. So if those colors match your room, or you're pressed for time, spray paint is definitely optional.
I bought Rust-Oleum Painter's Touch 2x Ultra Cover in Key Lime Gloss to match my room for about $4. Sweet!

Here is my toolbox "before"....
(please excuse my lazy, unedited iPhone pictures ;) )


And here is my toolbox after! Completed and ready to be filled!


Some notes about my toolbox experience...
I used scrapbook paper and printed off labels for my drawers, then cut them to size as I glued them. I also laminated the labels, because I'm addicted to laminating and because I thought they would be easy to change out if needed. However, it was actually a little too easy! The laminated labels really did not want to stick inside the drawers. So I had to use a lot of hot glue. Hot glue is my first instinct for any project, but if I did it again, I might research I different label method ;)

Also, make sure you're very sure (if that makes sense) about what you want each drawer to be. I ended up switching out two of mine during the process (don't look to closely at the "tape" drawer...) and it bothers me that it doesn't match completely. While the larger drawers are awesomely big, the smaller drawers really are small! Smaller than you might think. So keep that in mind when creating your labels. Don't make a small label for something that's not going to end up fitting in there...like I did! Haha.

Also, I got that scrapbook paper on sale for $10 at Hobby Lobby! Don't you love it? I've been using it for everything in my room. I love the unique-ness of the papers. You'll see it pop up again in next week's Made-It, I believe :)

So anyway, there's my toolbox! I absolutely love the way it turned out. I love organizing and I love school supplies. So you know I am going to have tons of fun filling this thing up and using it in my classroom!

Off to read some "made-its" and hopefully head to the pool while there's still time! (where is summer going??)
Have a great day! And don't forget to link up your made-it here.